Android TV can not connect to WiFi? Here are the corrections
Android TVs are great value for money because you have access to thousands of top TV apps. You can use Google Assistant on your Android TV and much more with just one voice command. However, there are some chronic issues with the Android TV that hinder the experience and one of them is the WiFi connection. Many users have reported that Android TV does not connect to WiFi even though the access point works well on other devices. On some TVs, WiFi is not even turned on. So if you encounter WiFi issues on your Android TV, follow our guide below to fix all the annoying issues on your TV.
Android TV can not connect to WiFi? Solve your problem here
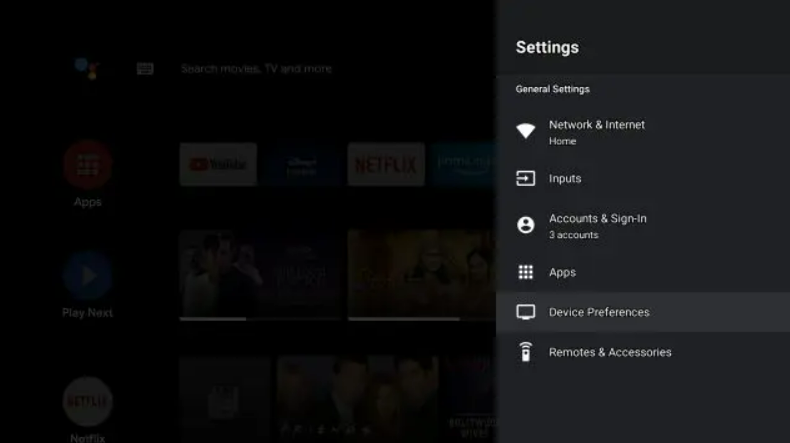
1. If your Android TV can't connect to WiFi, first, you need to adjust the time and date settings. To do this, open the settings by clicking on the gear icon at the top-right. Next, open Device Preferences.
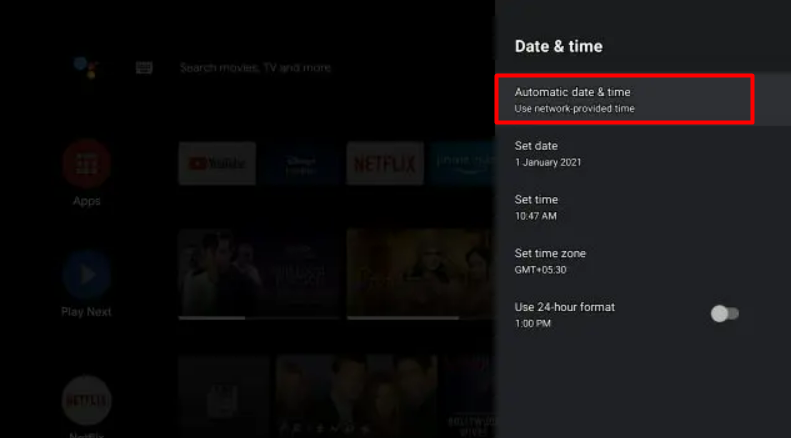
2. Next, open "Date and Time" and click on "Automatic Date and Time".
3. Here, select "Use network time" For most Android TV WiFi issues, this will fix the issue immediately. Also, if you get the "Connected, no internet" error, it will fix the problem then and there.
4. If the above steps don't work for you, follow these steps: Open Settings and go to "Network and Internet". Make sure the WiFi toggle is on. Next, open your WiFi access point.
5. Now, scroll down and click "Forget Network".
6. After that, enter the password and reconnect to WiFi again and this time your Android TV should fix WiFi.
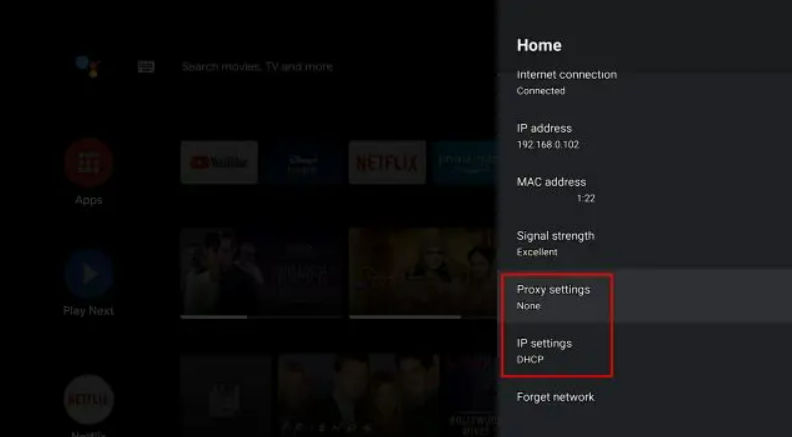
7. If the problem still persists, reopen your WiFi access point and make sure the proxy is set to "None" and the IP settings are set to "DHCP".
8. Other than that, some Android TVs face "hotspot wifi" problems where the TV smartphone is connected to the hotspot, but the internet doesn't work. This mainly happens when the data saver reaches its maximum limit. So to disable the data saver on Android TV, open Settings and go to "Network and Internet".
9. Here, open "Data Saver" and close it.
10. If you encounter problems such as your Android TV not showing WiFi, you may need to change some settings on your router. Open 192.168.0.1 in a browser from your computer or smartphone that is connected to WiFi. This will allow you to access your router settings.
11. Look for "SSID Broadcast" and ensure it's turned on. Typically, SSID settings are available under the Wireless section so look there. This will make your WiFi access point visible on all devices.
12. Next, some TVs do not support 5GHz WiFi connection. In that case, you need to change the settings of the router to broadcast both 2.4GHz and 5GHz channels. Under the Router Settings page, open Wireless Settings and enable Wireless Radio for both 2.4GHz and 5GHz channels. Now, you get your WiFi access point on your Android TV.
13. If Android TV WiFi toggle is disabled it is probably a hardware issue but we will try to fix some issues. When the TV is on, unplug the cord directly from the power outlet. Wait a minute and then plug in again and turn on your TV. Now check if you can turn on the WiFi switch on your Android TV.
14. If none of the above steps work for you, you can reset your Android TV. This will delete all your local files, apps, settings and remove your Google Account from your Android TV. After the reset process, you'll start a clean slate and, most likely, the "Android TV WiFi disabled" issue will go away.


